Braided updos are elegant and eye-catching, but sometimes it can be difficult to figure out where to start when creating one. These hairstyles often seem too complicated to even attempt. However, when broken down into steps, it’s easy to see that a boho braided updo can actually be quite simple to achieve. For those with medium to long hair, this boho braid tutorial will help you create a classy, stylish, and fun braided updo.
Step One: Prepare the Hair By Brushing
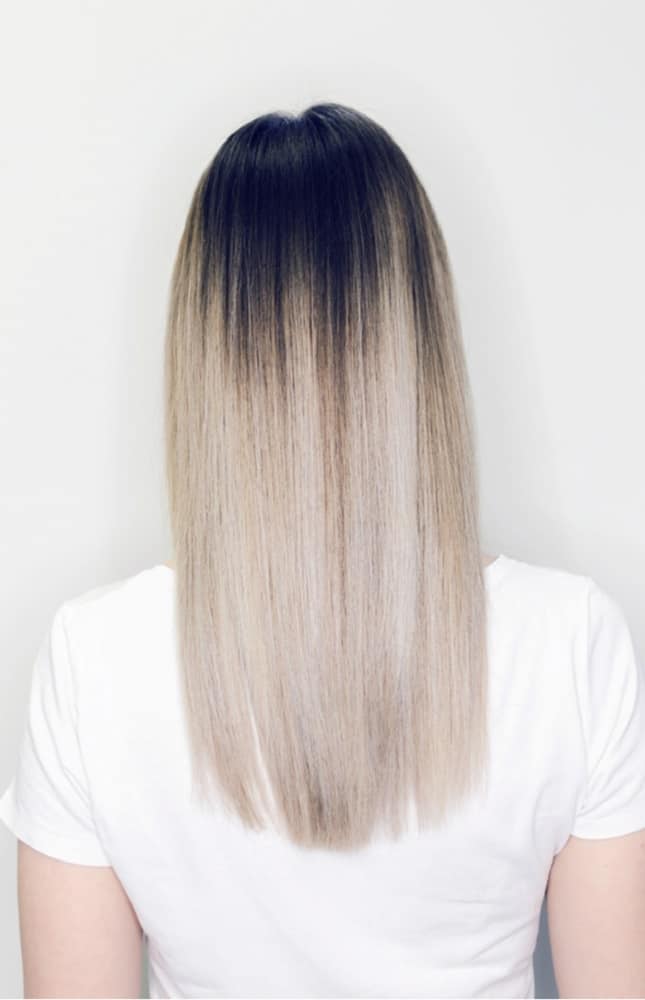
For the perfect braided hairstyle, it is very important to start with clean, tangle-free hair. Wash your hair with a quality shampoo in order to remove any oils, dirt, or products such as hairspray or hair gel. You can also condition your hair so that it is softer, smoother, and shinier in the final hairstyle.
Dry your hair completely, either with a hairdryer or by letting it air dry. Then, brush the hair so that it hands straight and has no tangles. You can use a wide-toothed comb, boar bristle brush, or a paddle brush with plastic bristles in order to do this. Which one you choose will depend on how thick your hair is and what texture it has.
If you find that your hair is frizzy or that you have flyaways at the top, you can add a bit of hair oil to moisturize and control your hair.
If you have bangs or shorter layers near your face, you have a couple of options. One choice is to pin these pieces back, tucking them into the hairstyle. Another option is to free these pieces, letting them frame the face. Which style you choose will depend on what you’re looking for in the finished product.
Step Two: Separate the Hair into Sections
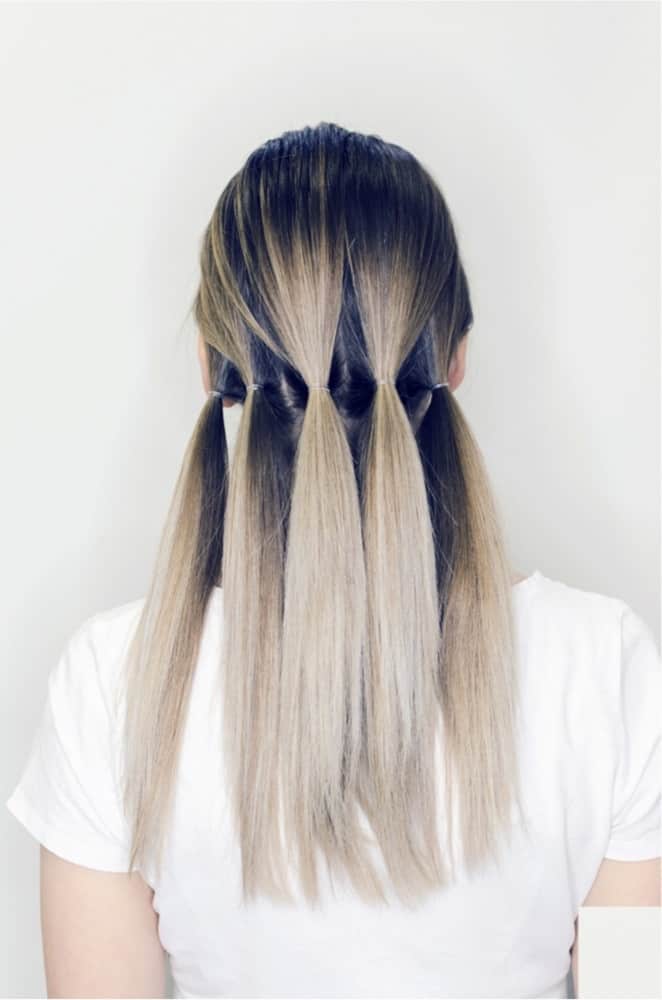
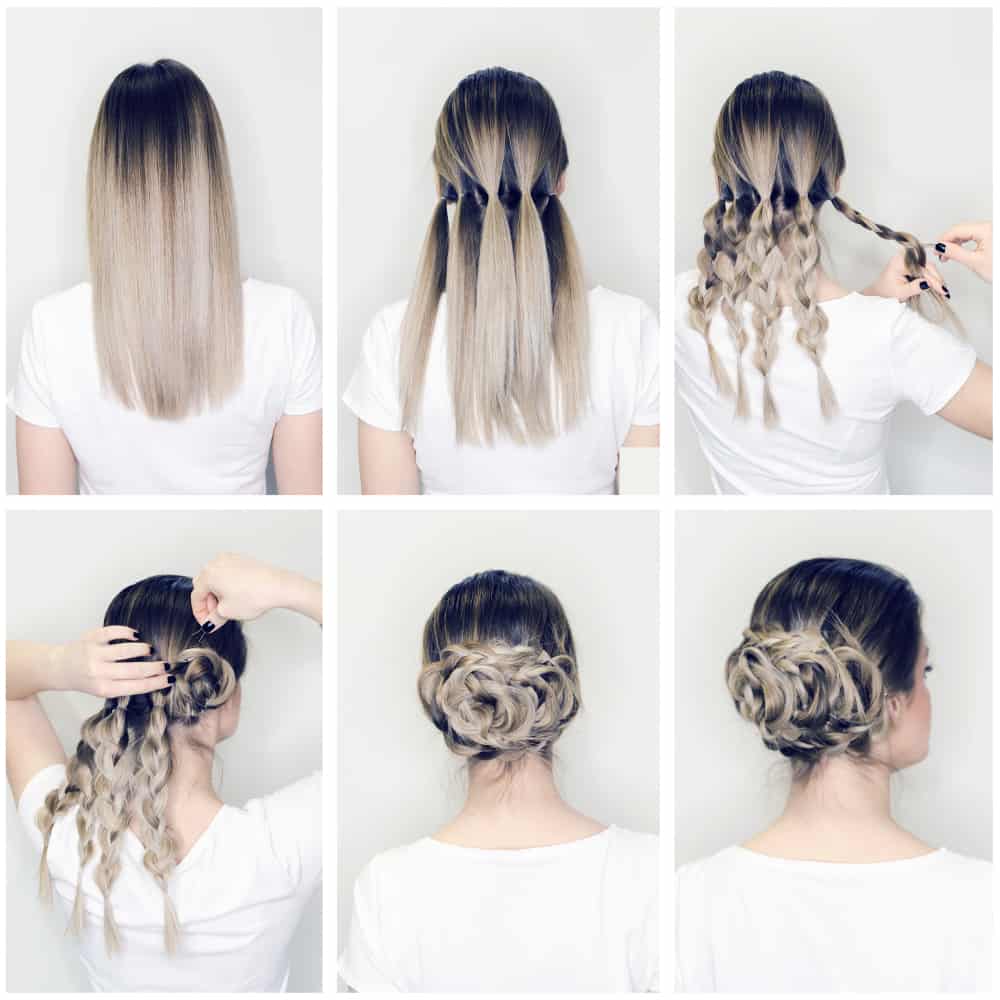
Separate your hair into five even sections. The simplest way to do this is to first separate the hair into two even pieces, right down the middle. Then, from each section, take a small piece from near the center and combine them to create the first smaller section. Then, divide the other two large sections in half. This way, you should end up with five even pieces.
Secure each piece with a rubber band or hair tie. The hair should be secured at about the level of the ears or slightly below, with the hair tie resting close to the scalp. Small plastic hair ties, either clear or in the color of your hair, are often the best choice, as they are easier to hide in the final hairstyle.
In addition, these hair ties, as opposed to rubber bands, are designed to be gentle on the hair. The hair at the top of the head should lie flat. You can brush through again to ensure that the hair is still tangle-free and that it looks smooth.
Step Three: Braid Each Section
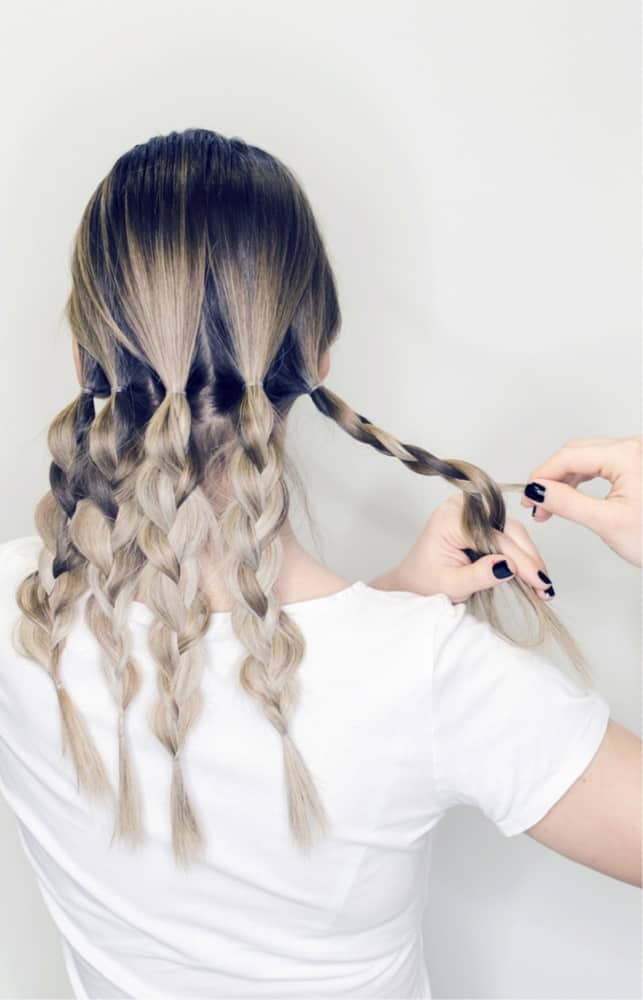
Braid each individual section of hair, securing each braid at the bottom with another hair tie. These braids should be the simplest style. To create them, separate each section into three smaller, even sections.
Cross the right-hand piece over the centerpiece. Then, cross the left-hand piece over the new centerpiece. Repeat this simple process until you have reached the end of the hair. Secure the braid about one to two inches from the hair’s end. Do this for each of the five sections of hair created in Step Two.
Once each braid is finished, you will need to loosen them a bit. To do this, begin at the top of the braid. Gently grasp the outer pieces of the braid and pull to create a looser, almost feathery look. Move down the braid, repeating this at each new section of the braid. Do this with all five completed braids. When finished, each braid will be shorter, and the braid itself will have a soft look.
Step Four: Begin Creating the Hairstyle
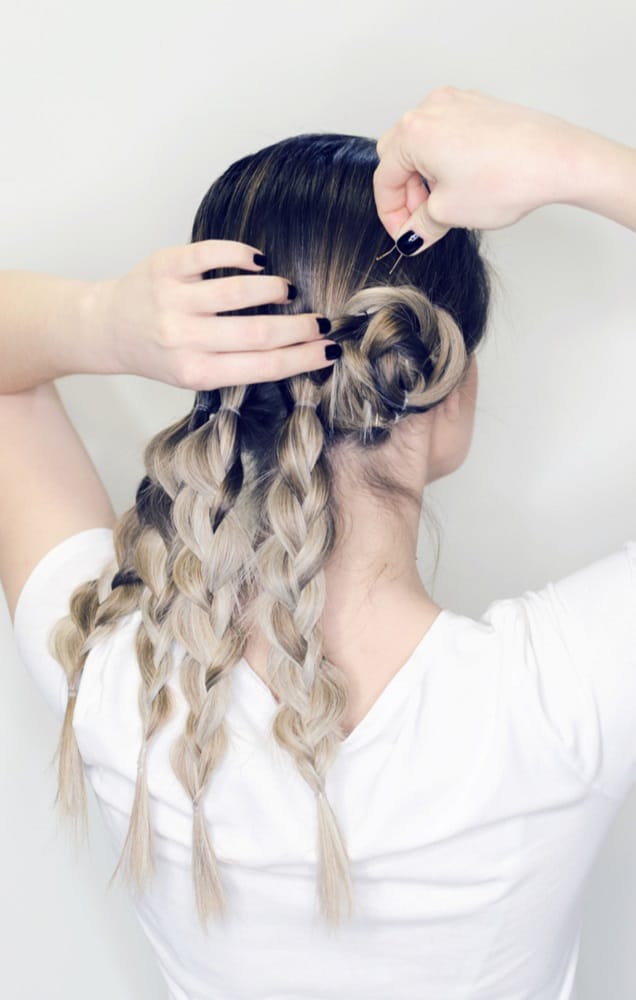
Starting with the braid that is the furthest to the right, gently twist the braid into a small bun. Don’t worry about how tight the finished bun is. It should be slightly loose, and a somewhat messy look will actually work better for the final hairstyle. Be sure to tuck the end pieces of the braid inside the bun so that they are completely hidden. Secure the bun with bobby pins, tucking them in so that the bun is secure and the pins are completely hidden in the hair.
Twist the far left braid into a similar bun, again hiding the end pieces. This bun should be level with the bun on the right-hand side of the head. Each bun should rest at about ear level and should be located just behind the ear. Again, leave the bun loose and wide, but make sure that it is secured well with bobby pins.
Create a third bun with the braid that is second to the right. When creating this bun, make sure that it slightly overlaps the first right-hand bun. This will create the gorgeous layered look that makes this hairstyle seem so pretty and so detailed. Again, secure the braid with bobby pins. Don’t be afraid to pin this bun into the original bun in order to keep everything locked in.
Twist the second left-hand braid into a bun, again overlapping the first left-hand bun. Secure this new bun with bobby pins. Depending on how big the original braids were, the new buns might touch or overlap near the middle of the head.
Finally, twist the middle braid into the last bun. This bun should be the same size as the other buns and should rest in the middle of the two inner buns. Its edges should overlap the other two buns. This bun should be centered near or directly in the middle of the head, at about ear level. Again, secure this bun well with bobby pins.
Step Five: Adjust the Hair and Secure with Bobby Pins
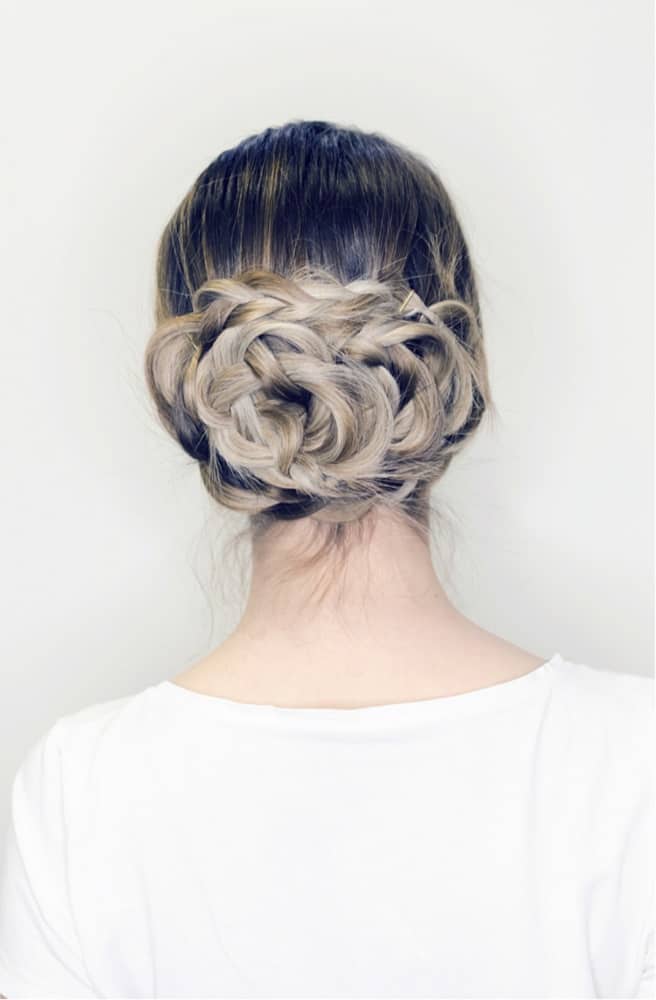
Your style is nearly complete. Use two mirrors to get a good look at the finished hairstyle. If there are any pieces of hair that have escaped their braids, gently tuck them back into the updo and secure them with another bobby pin. If any of the buns seem uneven, you can push or gently pull them into place. Add bobby pins where they are needed.
If anything about the hairstyle looks too tight, gently pull to loosen certain pieces. Remember, this is a boho look. It should be clean and neat, but it should also have an almost effortless feel to it. A bit more randomization and freedom in the finished style make it look carefree and fun.
Step Six: Apply the Finishing Touches
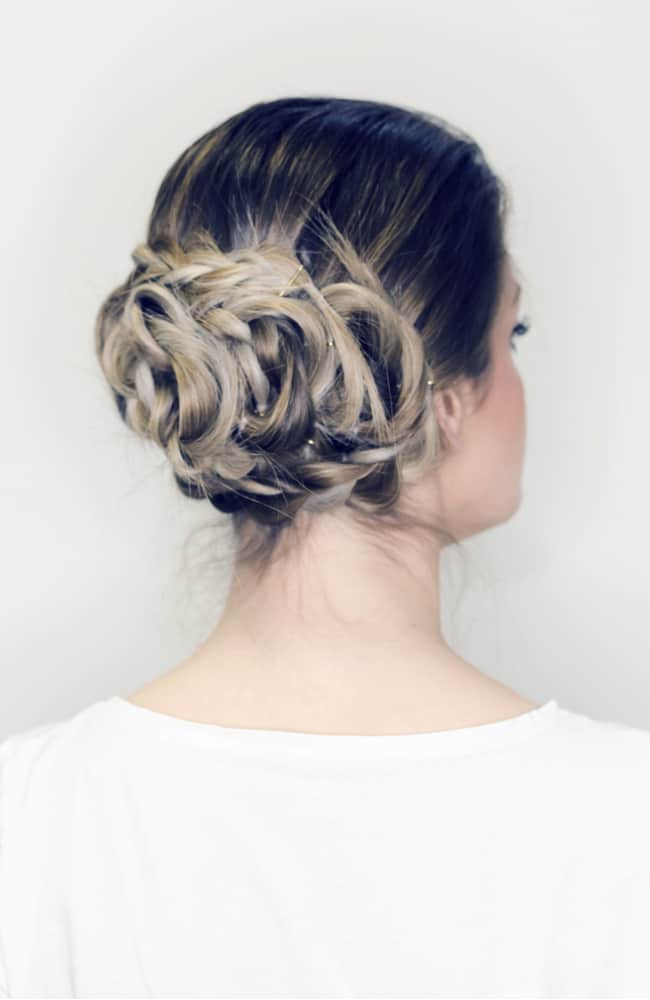
At this point, your hairstyle is complete. You can leave it as is if you like—if the bobby pins are secure and your hair has a habit of staying where you want it, you’re good to go. However, if you feel the hair needs a bit of extra hold, you can lightly spray the hairstyle with hairspray. This will give the style a bit more hold and ensure it doesn’t fall down. It will also help to keep the upper parts of the hair smooth.